Visa Process Made Simple: Your Step‑by‑Step Roadmap
Getting a visa can feel like solving a puzzle in the dark, but it doesn’t have to be that way. Below is a straight‑forward plan that walks you through every stage, from the moment you decide to travel to the day your passport arrives with that shiny stamp.
1. Gather the Right Documents Before You Start
The biggest time‑saver is to have all required papers on hand before you touch the online form. Typical items include a valid passport (with at least six months left), a recent passport‑size photo that meets the embassy’s specs, proof of travel (flight itinerary or reservation), accommodation details, and evidence of financial means (bank statements or sponsor letters). Some countries want a travel insurance policy, a cover letter explaining the trip’s purpose, or a completed invitation form if you’re visiting family. Check the official consulate website for the exact checklist – copying a friend’s list can lead to costly re‑submissions.
Pro tip: create a dedicated folder on your computer and name each file clearly (e.g., "Passport_2025.pdf"). This keeps things tidy when you upload files to the application portal.
2. Fill Out the Online Form Accurately
Most embassies now use digital applications. Treat the form like a quiz you’re taking to get into a club – honesty and precision matter. Double‑check spelling of names, dates, and passport numbers; a single typo can stall the process or get your request rejected. When a question asks for “N/A,” be sure the system allows it; some platforms require you to type “Not applicable” instead.
After you submit, you’ll usually receive a confirmation email with a reference number. Keep this number handy; you’ll need it to track your application and to book your appointment.
Next, schedule your biometric appointment or visa interview, depending on the country’s rules. Slots fill up fast, so book as soon as you have the confirmation. Arrive early, bring your receipt, all original documents, and any extra paperwork the embassy mentioned in the email.
During the interview, stay calm and answer questions directly. The officer isn’t looking for a perfect speech; they just want to verify that your purpose matches the visa type. If you’re travelling for work, bring a contract or invitation letter; for tourism, a detailed itinerary helps.
Once the interview is over, most embassies give a turnaround estimate – anything from a few days to a few weeks. Use this time to plan your trip logistics, but avoid making non‑refundable bookings until you have the visa in hand.
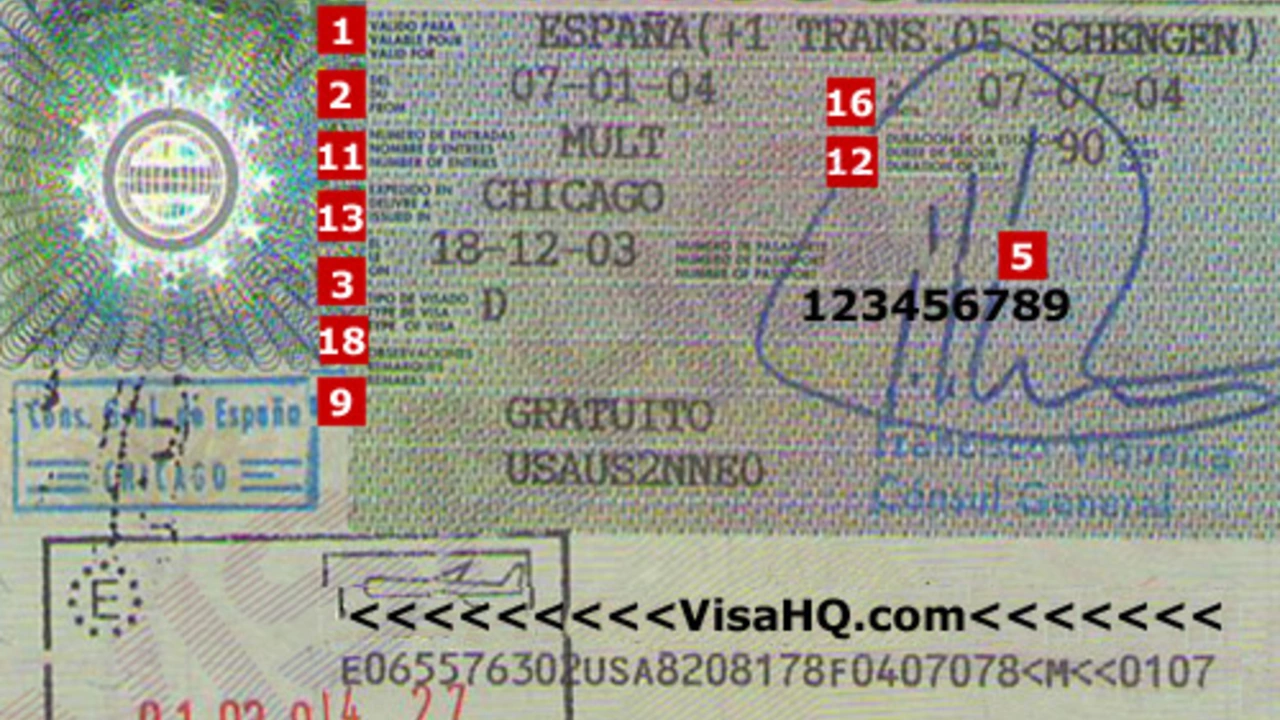
When your passport comes back, inspect the visa stamp for correct dates, number of entries, and any special conditions. If anything looks off, contact the embassy right away – it’s easier to fix mistakes before you leave the country.
Following these steps reduces stress, cuts down on back‑and‑forth emails, and gets you on the plane faster. Remember, the visa process is a set of rules; the more you follow them, the smoother the journey.
What is the process around a Spain work visa for an Indian?
Securing a work visa for Spain as an Indian citizen involves a few crucial steps. First, you need to secure a job in Spain, where your employer will initiate the work permit process on your behalf. After approval from the Spanish authorities, you can apply for a visa at the Spanish Embassy or Consulate in India. It's important to prepare all necessary documents, including a valid passport, job contract, and proof of no criminal record. Remember, the process may take several months, so it's advisable to plan ahead.